Halloween Cake Pops Recipe – Easy Spooky Treats Kids Love

Every October I end up staring at a Pinterest board full of spooky treats, wondering which one won’t turn into a sticky disaster. Sound familiar? Cake pops look fancy, so they feel like bakery territory.
Here’s the good news: this halloween cake pops recipe is built for real kitchens. No special pans, no fussy tempering, and no tears when a pop slides off its stick (I’ve been there).
You need one cake, a little frosting, and candy melts. That’s it for the base. From there, you can turn every pop into a ghost, a pumpkin, or a creepy eyeball.
Prep takes about 45 minutes, plus chill time, and it makes 24 pops. If you want easy halloween cake pops that still wow a party crowd, you’re in the right spot.
↓ Jump straight to the recipe using the button above, or keep reading for all my tips!
Why You’ll Love This Halloween Cake Pops Recipe
✔️ Beginner-friendly — If you can crumble cake and stir frosting, you can make these. No decorating degree required.
✔️ Pantry staples only — A boxed mix, canned frosting, and candy melts do all the heavy lifting.
✔️ Make-ahead magic — Finish them days before the party, so Halloween night stays stress-free.
✔️ Freezer-friendly — Bake once, stash extras, and pull out a family-favorite treat whenever the craving hits.
✔️ Totally customizable — One simple base turns into ghosts, pumpkins, and eyeballs with a few swaps.
✔️ Kid-approved fun — Little hands love rolling, dipping, and sprinkling, so the whole house joins in.
Ingredients You’ll Need
This simple list works for every cake pop halloween idea in this post. Grab everything before you start, because melted candy waits for no one.
Main Ingredients
| Ingredient | Amount | Why It’s Used | Substitute |
|---|---|---|---|
| Chocolate cake mix (15.25 oz box) | 1 box, baked as directed | Gives a moist, fudgy base | Yellow or red velvet mix |
| Vanilla or chocolate frosting | ½ cup (120 g) | Binds crumbs into a dough | Cream cheese frosting |
| Orange candy melts | 12 oz (340 g) | Creates a smooth, snappy shell | Chocolate chips plus coconut oil |
| White candy melts | 12 oz (340 g) | Makes ghosts and web details | White chocolate wafers |
| Lollipop sticks | 24 sticks | Holds each pop upright | Sturdy paper straws |
| Candy eyes | 48 pieces | Adds instant spooky faces | Mini chocolate chips |
| Coconut oil | 1 tbsp | Thins coating for easy dipping | Vegetable shortening |
| Black decorating icing | 1 small tube | Draws mouths and details | Melted dark chocolate |
Blogger Note: Don’t skip real candy melts. Regular chocolate chips seize and turn thick, which leaves lumpy, streaky pops. Candy melts are made to set firm, so your coating stays glossy and crack-free.
Optional Add-ins & Variations
- Orange sprinkles: Adds a crunchy, festive finish to pumpkin pops.
- Crushed Oreos in the cake: Gives a cookies-and-cream twist with extra texture.
- A pinch of espresso powder: Deepens the chocolate flavor without tasting like coffee.
- Peanut butter in the frosting: Creates a rich, candy-bar-style center.
- Green candy melts: Perfect for pumpkin stems or monster pops.
Ingredient Substitutions
- Dairy-free: Use dairy-free cake mix, vegan frosting, and dairy-free candy melts.
- Gluten-free: Pick a gluten-free cake mix and check your candy eyes and sprinkles.
- Egg-free: Swap the eggs on the cake box for ¼ cup applesauce each.
- Sugar alternatives: Use a reduced-sugar cake mix and sugar-free chocolate coating.
Equipments
- 9×13-inch baking pan
- Large mixing bowl
- Rubber spatula or fork
- Cookie scoop (1½ tablespoons)
- Parchment-lined baking tray
- Microwave-safe tall, narrow cup
- Lollipop sticks
- Styrofoam block or upside-down box
- Spoon or toothpick

How to Make Halloween Cake Pops – Step by Step
Wondering how to make halloween cake pops without the stress? Follow these seven steps in order. They’re what I use every single October.
Step 1 – Bake and Cool the Cake
Bake the cake in a 9×13-inch pan following the box directions. Let it cool completely, which takes about an hour.
👁️ Visual Cue: The cake feels cool to the touch and springs back when pressed.
⚠️ Watch Out: Warm cake turns greasy when mixed with frosting. Patience here saves your texture.
Step 2 – Crumble the Cake
Break the cooled cake into a large bowl. Use your hands or a fork to crush it into fine, even crumbs.
👁️ Visual Cue: No chunks bigger than a pea remain, and the crumbs look like damp brownie mix.
💡 Pro Tip: Remove the dark outer edges first. They make the dough dry and uneven.
Step 3 – Mix in the Frosting
Add the frosting a few spoonfuls at a time. Mix until the crumbs hold together when squeezed.
👁️ Visual Cue: The dough looks like soft cookie dough and sticks to itself, not your fingers.
⚠️ Watch Out: Too much frosting makes pops heavy and greasy. Start small, then add more only if needed.
Step 4 – Roll and Chill the Balls
Scoop about 1½ tablespoons of dough and roll it into a smooth ball. Place the balls on a parchment-lined tray and chill for 30 minutes.
👁️ Visual Cue: Each ball feels firm and cold, with no cracks on the surface.
💡 Pro Tip: Use a cookie scoop so every pop bakes up the same size and looks bakery-neat.
Step 5 – Melt the Candy Coating
Melt the orange candy melts with coconut oil in 30-second bursts, stirring each time. Pour the coating into a tall, narrow cup for easy dipping.
👁️ Visual Cue: The coating drips off a spoon in a smooth, thick ribbon.
⚠️ Watch Out: Overheated candy melts turn grainy. Stop microwaving as soon as most pieces look soft.
Step 6 – Attach the Sticks and Dip
Dip each stick tip about half an inch into the melted candy, then push it halfway into a ball. Let that anchor set for 5 minutes. Then dip the whole pop straight down, lift, and tap off the extra coating.
👁️ Visual Cue: The pop looks evenly coated and shiny, with no bare spots near the stick.
💡 Pro Tip: Gently rotate the pop while you tap the stick. This smooths the shell and prevents drips.
Step 7 – Decorate Before It Sets
Add candy eyes, sprinkles, or drizzles right after dipping. Stand each pop in a foam block or upside-down box to dry.
👁️ Visual Cue: The coating turns matte and firm in about 10 minutes.
💡 Pro Tip: Work one pop at a time. Candy sets fast, and late decorations slide right off.
Expert Tips for the Best Results
🔑 TIP #1: Keep the Balls Cold Cold cake balls hold their shape in warm candy. If the dough warms up, the fat softens and the ball can slip off the stick. Work in small batches and keep the rest in the fridge.
🔑 TIP #2: Dip the Stick First The melted candy on the stick acts like edible glue. It hardens around the cake and locks the stick in place. This single step prevents most cake pop disasters.
🔑 TIP #3: Match Temperatures A very cold ball dipped in hot coating causes tiny cracks as the shell cools and shrinks. Let chilled balls sit for two minutes before dipping. The coating then sets smoothly.
🔑 TIP #4: Thin With Oil, Not Water A drop of water makes candy melts seize instantly. Coconut oil or shortening thins the coating without changing how it sets. Add one teaspoon at a time.
🔑 TIP #5: Use a Tall Cup A deep, narrow cup lets you dip the whole pop in one smooth motion. A wide bowl needs spooning and leaves uneven spots. Reheat the cup as needed to keep the candy fluid.
Halloween Cake Pops Variations to Try
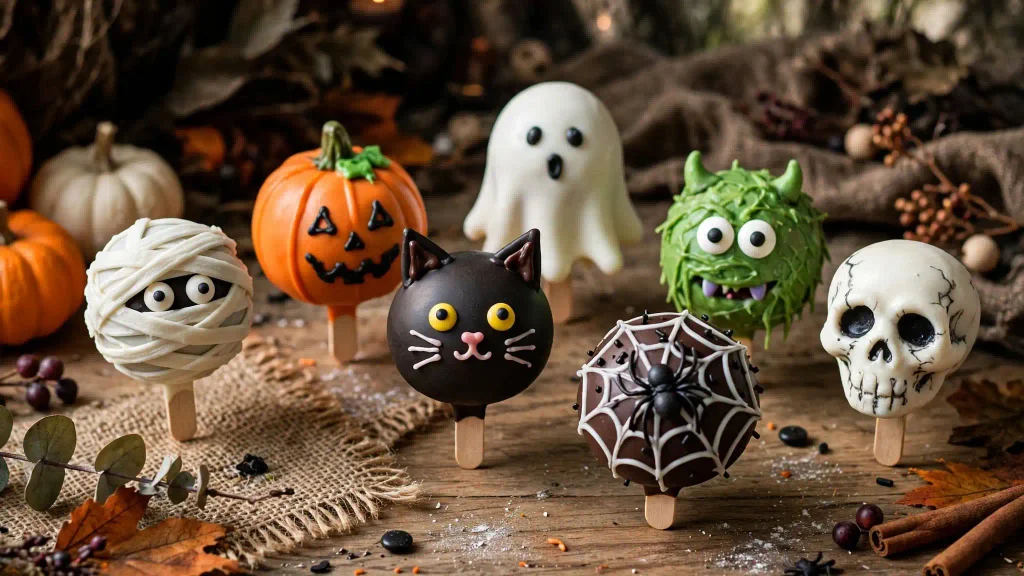
Once you master the base, these halloween cake pop ideas keep every party table fresh.
Pumpkin Cake Pops
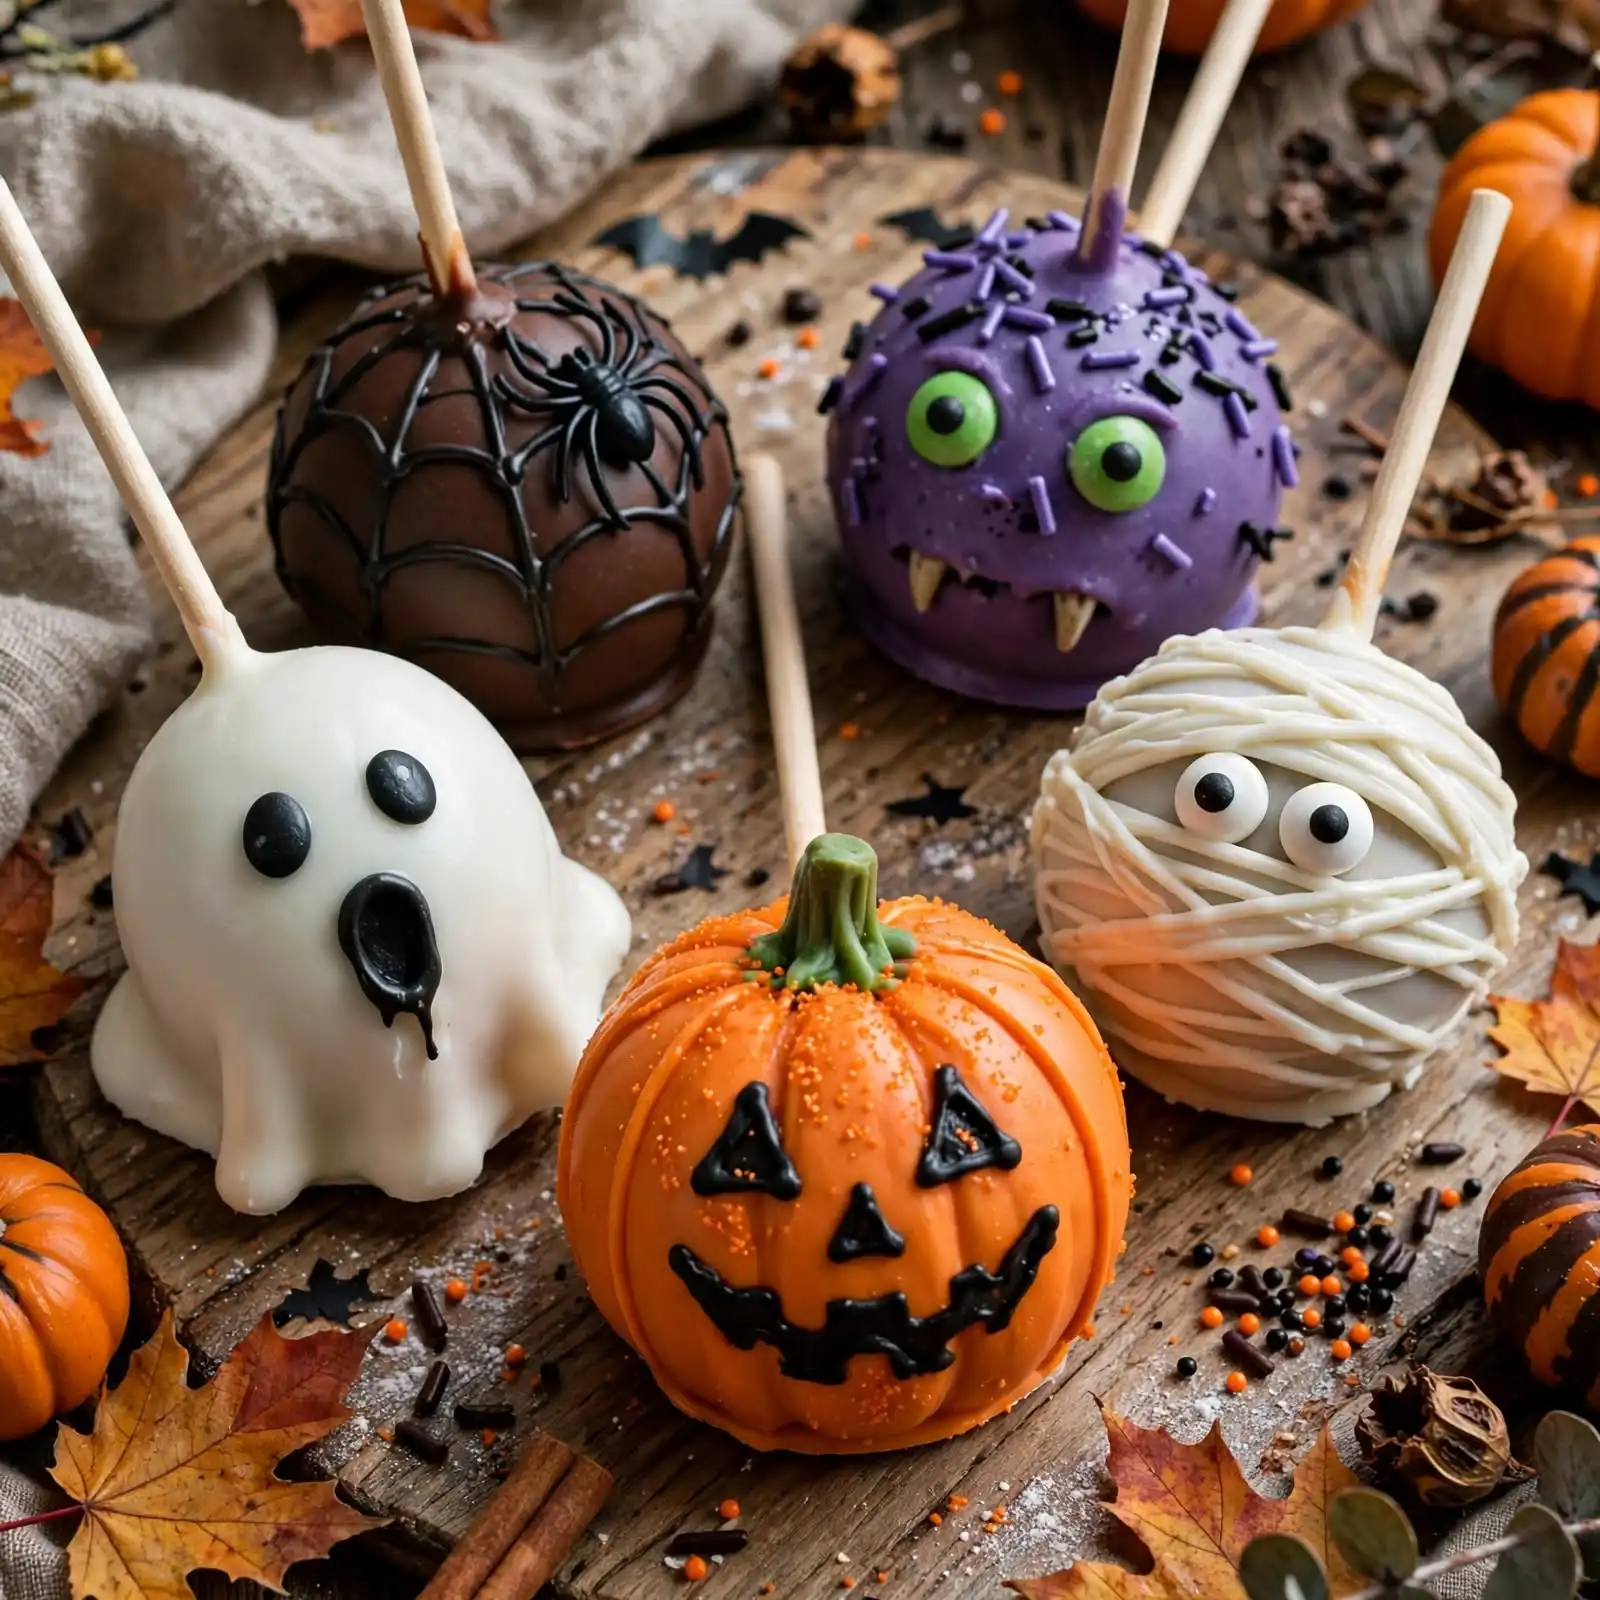
Tint the coating orange and press a small green candy stem on top. Pumpkin cake pops look adorable with a swirl of black icing for ridges. Try a pumpkin cake pop with spice cake for a fall-flavored twist.
Ghost Cake Pops
Dip the balls in white candy melts and add two candy eyes while wet. Ghost cake pops look best with a tiny black icing mouth. Gently shape the base into a soft teardrop for a floaty look.
Eyeball Cake Pops
Coat the pops in white melts, then press on a blue or green candy for the iris. Add a black dot and thin red icing veins. These eyeball cake pops are gross-out gorgeous and always disappear first.
Halloween Cake Popsicles
Shape the dough into small popsicle forms, dip them, and stick them on lollipop sticks. Halloween cake popsicles look like frozen treats but stay shelf-stable. They’re a fun twist for kids who love novelty shapes. Fans of the classic halloween pop cake style will love them too.
Christmas Cake Pops
The same method works all winter long. Swap orange for red and green melts, then top with crushed peppermint. These christmas cake pops are perfect for cookie swaps. Search cake pops christmas, cake pop xmas, or xmas cake pops, and you’ll find endless ideas using this exact base. Chicken Pasta Recipe – Easy Tomato Dinner Everyone Loves.
Want more ways to turn a boxed mix into something special? Try this halloween cake recipe idea: bake the same batter in a Bundt pan and drizzle with orange glaze. For a traditional cake pop recipe halloween twist, bake the crumbs from a from-scratch chocolate cake instead.
How to Store, Refrigerate & Freeze
Room Temperature Storage
Keep finished pops in an airtight container with parchment between layers. They stay fresh for up to 3 days in a cool spot. Avoid sunny windows, because the coating can soften and sweat.
Refrigerator Storage
Store pops in a sealed container for up to 7 days. Let them sit at room temperature for 15 minutes before serving. Condensation can form on cold pops, so don’t open the container until you’re ready to eat.
Freezer Instructions & How to Reheat
Freeze undipped cake balls on a tray, then move them to a freezer bag for up to 2 months. Thaw overnight in the fridge, then dip and decorate as usual. Fully finished pops also freeze well in airtight containers for up to 1 month, and they thaw in the fridge overnight. Halloween Cupcakes – Easy, Spooky Treats Everyone Loves.
What to Serve With Halloween Cake Pops
A good party table balances sweet, savory, and sippable. Here are my favorite pairings.
🧈 Simple Spreads & Toppings
- A bowl of sprinkles and crushed cookies for dipping
- Melted chocolate for a drizzle station
- Fresh whipped cream for dunking
- Marshmallow fluff for sticky, gooey fun
☕ Drink Pairings
- Hot apple cider with a cinnamon stick
- Creamy hot chocolate with marshmallows
- A warm chai latte
- Cold milk, always
Browsing for more? My Halloween Cookies – Easy, Spooky Treats Everyone Loves pair well with a cozy morning treat table, and my Spooky Spiderweb Chocolate Cupcakes – Easy Halloween Treat keep busy October evenings simple.
🍨 Dessert Style Serving
- Pops stuck in a pumpkin for a centerpiece
- A “spooky sundae” with pops crumbled over vanilla ice cream
- A dessert board with cookies, candy corn, and mini cupcakes
New to sweets? My Halloween Trail Mix Recipe – Easy, Spooky & Irresistible will help you nail every batch.
Frequently Asked Questions
What Is The Trick To Cake Pops?
Keep your cake balls cold and dip the stick tip in melted candy first. This anchors the pop so it stays put during dipping.
How To Make 3 Ingredient Cake Pops?
Crumble a baked cake, mix it with frosting, and roll it into balls. Chill them, then dip them in melted candy coating on sticks.
What Is The Best Recipe For Cake Pops?
A boxed cake, canned frosting, and candy melts give the most reliable results. This halloween cake pops recipe uses that formula for easy, consistent pops.
What Is The Best Binder For Cake Pops?
Canned frosting is the best binder. Cream cheese frosting works too, but use less because it’s softer.
Nutrition Information
Per pop (based on 24 pops):
| Calories | Fat | Carbohydrates | Protein | Sugar | Fiber | Sodium |
|---|---|---|---|---|---|---|
| 190 kcal | 9 g | 26 g | 1 g | 21 g | 1 g | 120 mg |
The candy coating adds the most calories. To cut some, use a thinner coat or dip only the top half of each pop. Exact values vary based on the brands and ingredients you use.
Halloween Cake Pops
Ingredients
Equipment
Method
- 1 box chocolate cake mix (15.25 oz), plus ingredients listed on the box
- ½ cup vanilla or chocolate frosting
- 12 oz orange candy melts
- 12 oz white candy melts
- 1 tbsp coconut oil
- 24 lollipop sticks
- 48 candy eyes
- 1 small tube black decorating icing
- Orange sprinkles, optional
- Instructions
- Bake the cake in a 9×13-inch pan as directed and cool completely.
- Crumble the cooled cake into fine crumbs in a large bowl.
- Mix in the frosting, a few spoonfuls at a time, until the dough holds together.
- Roll the dough into 24 balls, about 1½ tablespoons each.
- Chill the balls on a parchment-lined tray for 30 minutes.
- Melt the candy melts with coconut oil in 30-second bursts, stirring each time.
- Dip each stick tip into the candy and insert it halfway into a ball.
- Let the sticks set for 5 minutes.
- Dip each pop into the melted coating, then tap off the extra.
- Add candy eyes, icing details, or sprinkles right away.
- Stand the pops upright and let them set for 10 minutes.
Notes
- Keep the dough cold for smooth, crack-free coating.
- Use candy melts, not chocolate chips, for the best shine.
- Store in an airtight container for up to 3 days at room temperature.
- Freeze undipped balls for up to 2 months for stress-free prep.